As a child, I fondly remember selling lemonade on the corner to scrape up a few bucks to spend on sugary treats and baseball cards at the local drugstore.
In those days, my best friend Josh and I would set up on a card table with a hand-drawn sign to sell lemonade prepared by my supportive mother. (We were smart enough not to subject the public to lemonade mixed by a couple of seven-year-olds.) I clearly remember discussing how we should make a permanent lemonade stand to keep our money-making operation flowing.
Now, nearly 40 years later, a co-worker asked me to tackle this long forgotten woodworking project. So here’s how to make a DIY lemonade stand as an outdoor playset for your front yard.
Cutting List
Overall dimensions: 57-1/2-in. H x 25-1/2-in. W x 48-in. L
| KEY | QTY. | PART | DIMENSIONS |
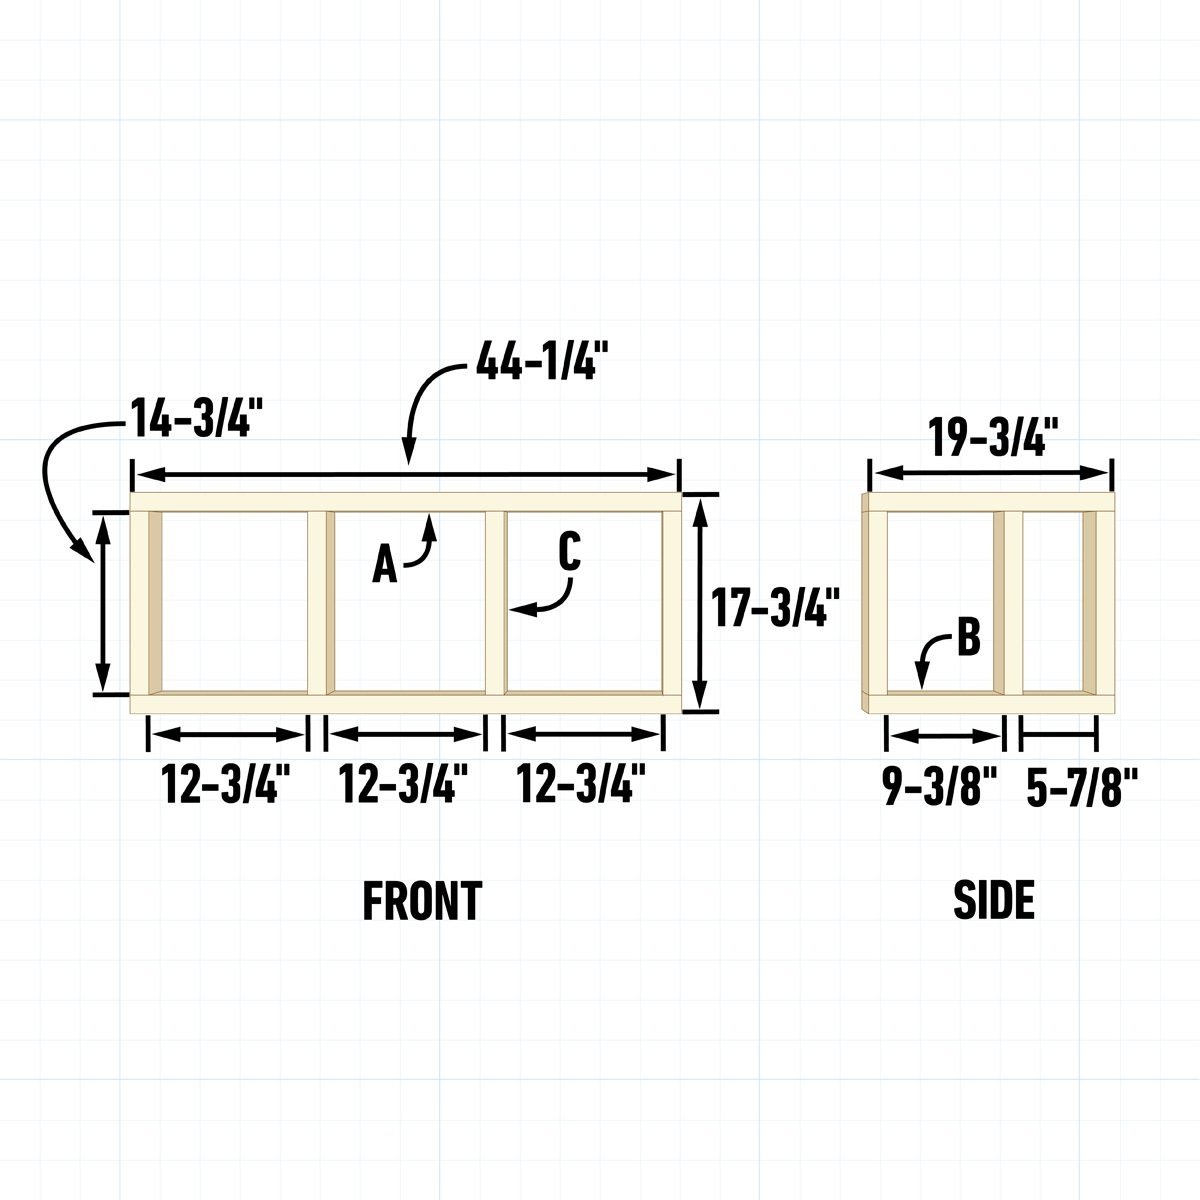
| A | 2 | Front Frame Top/Bottom | 1-1/2″ x 3-1/2″ x 44-1/4″ |
| B | 4 | Side Frame Top/Bottom | 1-1/2″ x 3-1/2″ x 19-3/4″ |
| C | 10 | Frame Studs | 1-1/2″ x 3-1/2″ x 14-3/4″ |
| D | 1 | Plywood Bottom | 3/4″ x 23-1/4″ x 44-1/4″ |
| E | 1 | Front Skirt | 1-1/2″ x 1-1/2″ x 41-1/4″ |
| F | 2 | Side Skirt | 1-1/2″ x 1-1/2″ x 23-1/4″ |
| G | 1 | Front Beaded Panel | 3/8″ x 41-1/4″ x 20″* |
| H | 2 | Side Beaded Panel | 3/8″ x 24″ x 20″* |
| J | 2 | Back Beaded Panel | 3/8″ x 3-1/2″ x 20″* |
| K | 1 | Plywood Countertop | 3/4″ x 24″ x 45″ |
| L | 2 | Uprights | 1-1/2″ x 3-1/2″ x 56-1/2″ |
| M | 1 | Top Chalkboard | 3/4″ x 8″ x 48″ |
| N | 1 | Front Chalkboard | 3/4″ x 15″ x 25″ |
| P | 2 | Countertop Edge Front/Back | 3/4″ x 1-1/2″ x 46-1/2″** |
| Q | 4 | Countertop Edge Sides | 3/4″ x 1-1/2″ x 11″** |
| R | 4 | Corner Molding | 3/4″ x 3/4″ x 19-1/4″ |
* – Denotes bead direction.
** – Miter cuts required.
Build the Framing
To begin building the lemonade stand:
- Gather all 2×4 parts A, B, and C from your cutting list and assemble them as shown below.
- Attach the framing members together with three-inch screws or framing nails.
- Construct one front frame and two identical side frames.

Did you miss our previous article...
https://rsssuperfeeds.com/life-hacks/gardyn-microgreens-growing-kit-review


