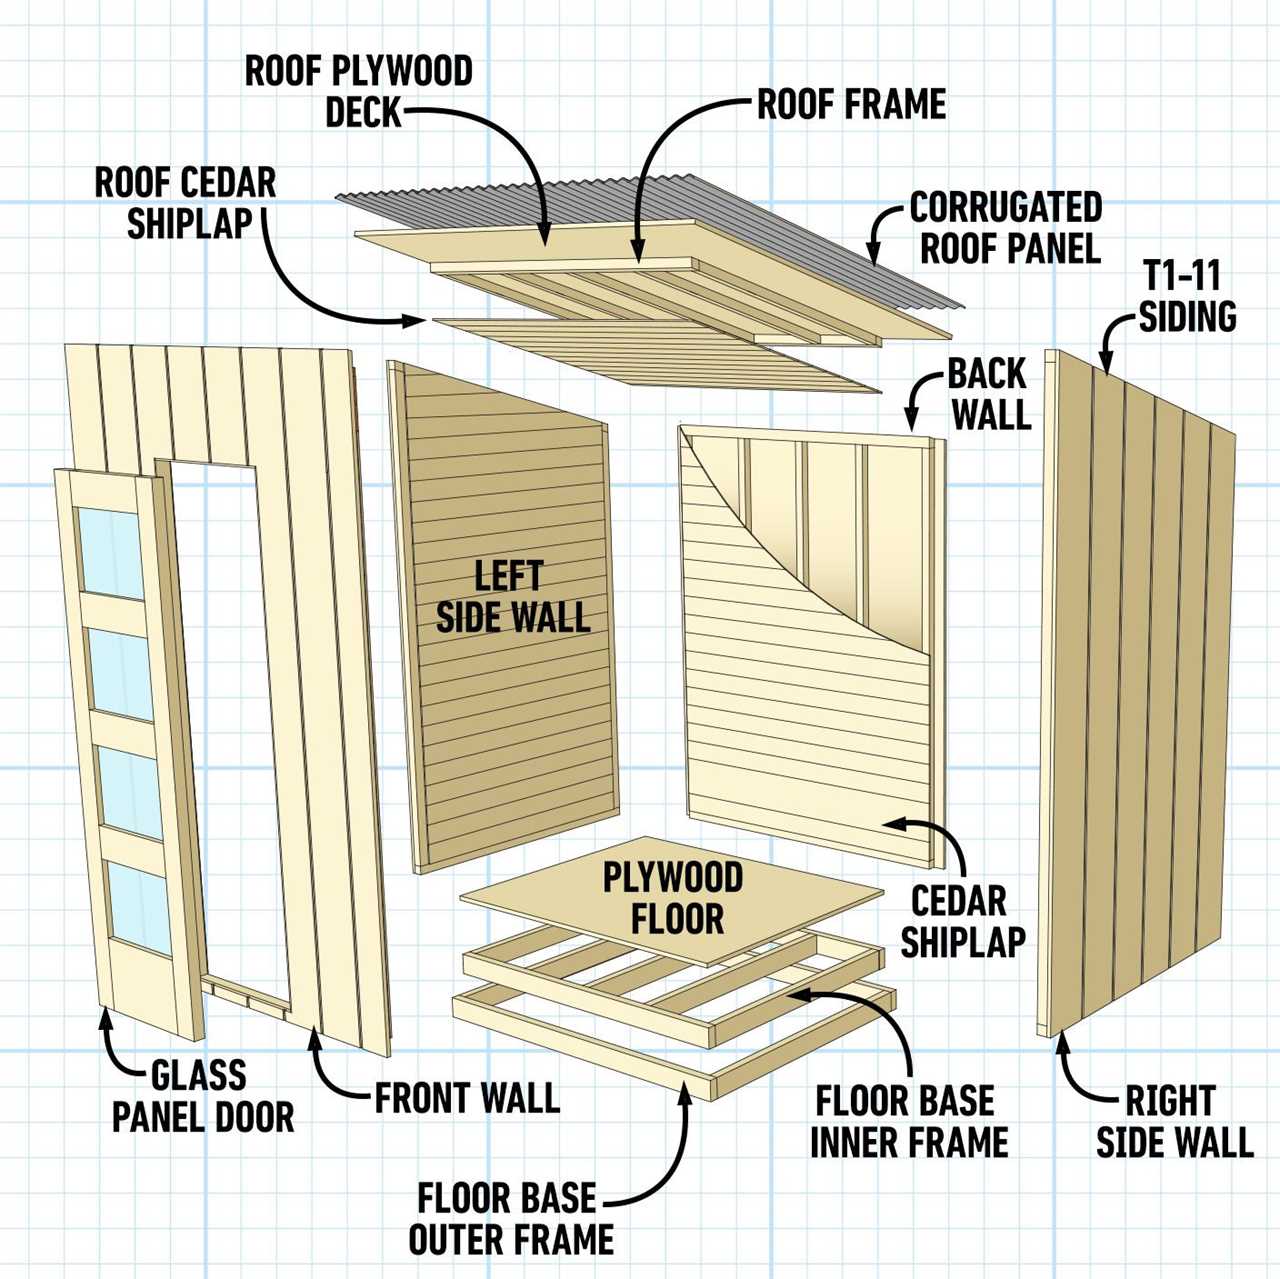
I built this sauna with accessible and affordable materials you can find at your local building center. The simple design enables you to easily construct the four walls, floor, roof and benches on-site or in your garage, then transport it to a remote location.
The sauna is five feet wide x four feet deep x 7-ft. 8-in. tall. Build your sauna to the size that meets your needs. See Figure 1 for a look at how it all goes together.
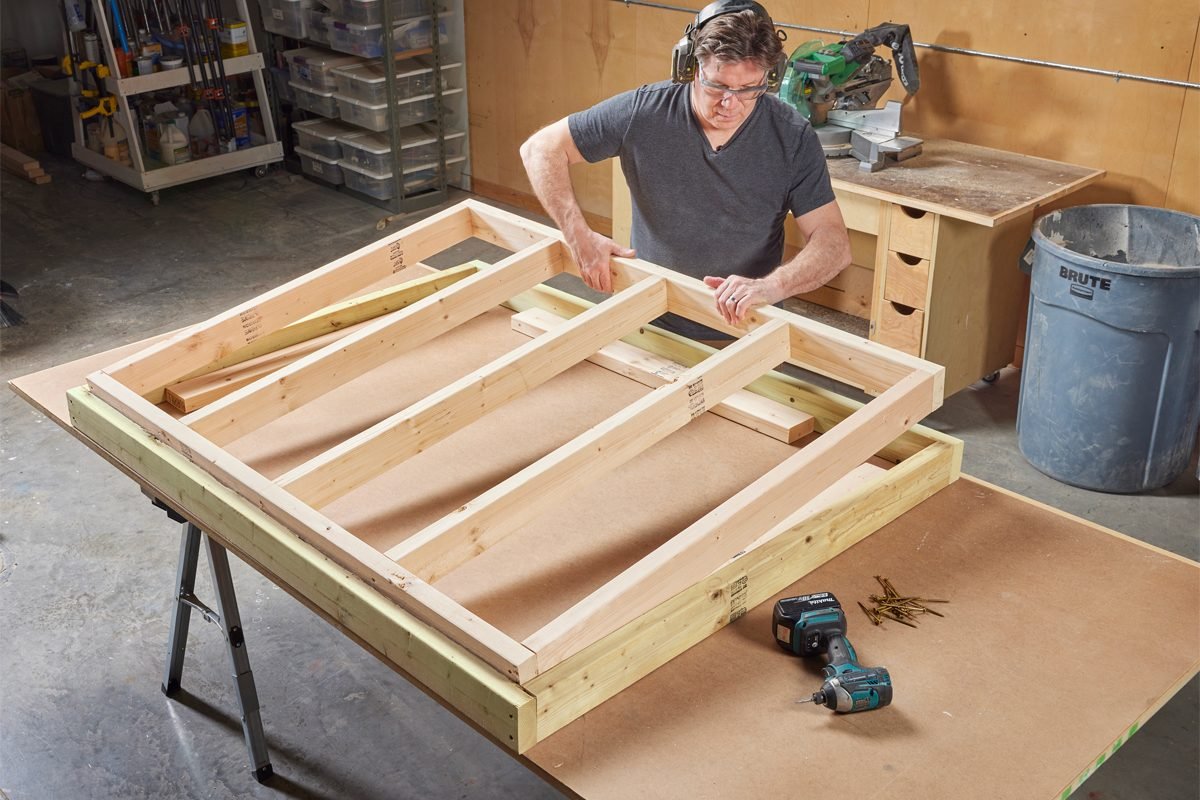
Before you start cutting boards and pounding nails, put together a flat work surface such as a 4×8 sheet of plywood on sawhorses. This will make assembling and maneuvering the components of the project much easier. Enlist a helper to assist in lifting walls and roof components.
When purchasing materials, always buy a few extra 2x2s and 2x4s for your project. You can often return what you don’t use.
Figure 1
Overall dimensions: 95-in. H x 6-in. W x 48-in. D.
Cutting List
| KEY | QTY. | PART | DIMENSIONS |
| A | 2 | Floor Base Outer Frame Front & Back (Green Treated) | 1-1/2″ x 3-1/2″ x 60″ |
| B | 2 | Floor Base Outer Frame Sides (Green Treated) | 1-1/2″ x 3-1/2″ x 45″ |
| C | 2 | Floor Base Inner Frame Front & Back | 1-1/2″ x 3-1/2″ x 57″ |
| D | 5 | Floor Base Inner Frame Stringers | 1-1/2″ x 3-1/2″ x 42″ |
| E | 1 | Floor Base Plywood Floor | 3/4″ x 45″ x 57″ |
| F | 2 | Front & Back Walls Bottom Plate | 1-1/2″ x 1-1/2″ x 57″ |
| G | 2 | Front & Back Walls Top Plate/w 15-Degree Angle | 1-1/2″ x 1-7/8″ x 57″ |
| H | 2 | Front Wall 2×2 Stud | 1-1/2″ x 1-1/2″ x 84-9/16″ |
| I | 2 | Front Wall 2×4 Stud | 1-1/2″ x 3-1/2″ x 84-9/16″ |
| J | 1 | Doorway Header | 1-1/2″ x 3-1/2″ x 22-1/4″ |
| K | 5 | Back Wall Studs | 1-1/2″ x 1-1/2″ x 72-3/16″ |
| L | 2 | Side Wall Bottom Plate | 1-1/2″ x 1-1/2″ x 48″ |
| M | 2 | Side Walls Top Plate/w 15-Degree Angles | 1-1/2″ x 1-1/2″ x 49-11/16″ |
| N | 2 | Side Walls Front Stud/w 15-Degree Angles | 1-1/2″ x 3-1/2″ x 85″ |
| O | 2 | Side Walls Stud/w 15-Degree Angles | 1-1/2″ x 1-1/2″ x 81-5/8″ |
| P | 2 | Side Walls Stud/w 15-Degree Angles | 1-1/2″ x 1-1/2″ x 78-3/4″ |
| Q | 2 | Side Walls Stud/w 15-Degree Angles | 1-1/2″ x 1-1/2″ x 75-7/8″ |
| R | 2 | Side Walls Back Stud/w 15-Degree Angles | 1-1/2″ x 3-1/2″ x 73-1/16″ |
| S | 2 | Roof Frame Front & Back /w 15-Degree Angle | 1-1/2″ x 1-7/8″ x 53-3/4″ |
| T | 5 | Roof Frame Studs | 1-1/2″ x 1-1/2″ x 41-7/8″ |
| U | 1 | Roof Deck | 3/4″ x 73″ x 63″ |
| V | 13 | Roof Cedar Shiplap | 1/4″ x 3-1/2″ x 55-3/4″ |
| W | 46 | Front & Back Walls Cedar Shiplap | 1/4″ x 3-1/2″ x 56″ |
| X | 50 | Side Walls Cedar Shiplap | 1/4″ x 3-1/2″ x 45″ |
| Y | 2 | Front & Back Roof Trim | 3/4″ x 2-1/2″ x 74-1/2″ |
| Z | 2 | Side Roof Trim | 3/4″ x 2-1/2″ x 63″ |
| Aa | 2 | Side Wall T1-11 Siding | 9/16″ x 48″ x 88″ |
| Bb | 1 | Back Wall T1-11 Siding | 9/16″ x 48″ x 75-9/16″ |
| Cc | 1 | Back Wall Filler T1-11 Siding | 9/16″ x 13-1/2″ x 75-9/16″ |
| Dd | 2 | Front Wall T1-11 Siding | 9/16″ x 48″ x 88″ |
| Ee | 2 | Front Wall Filler T1-11 Siding | 9/16″ x 13-1/2″ x 88″ |
| Ff | 2 | Front Corner Trim | 3/4″ x 2-1/2″ x 88″ |
| Gg | 2 | Back Corner Trim | 3/4″ x 2-1/2″ x 75″ |
The Sauna Floor Base
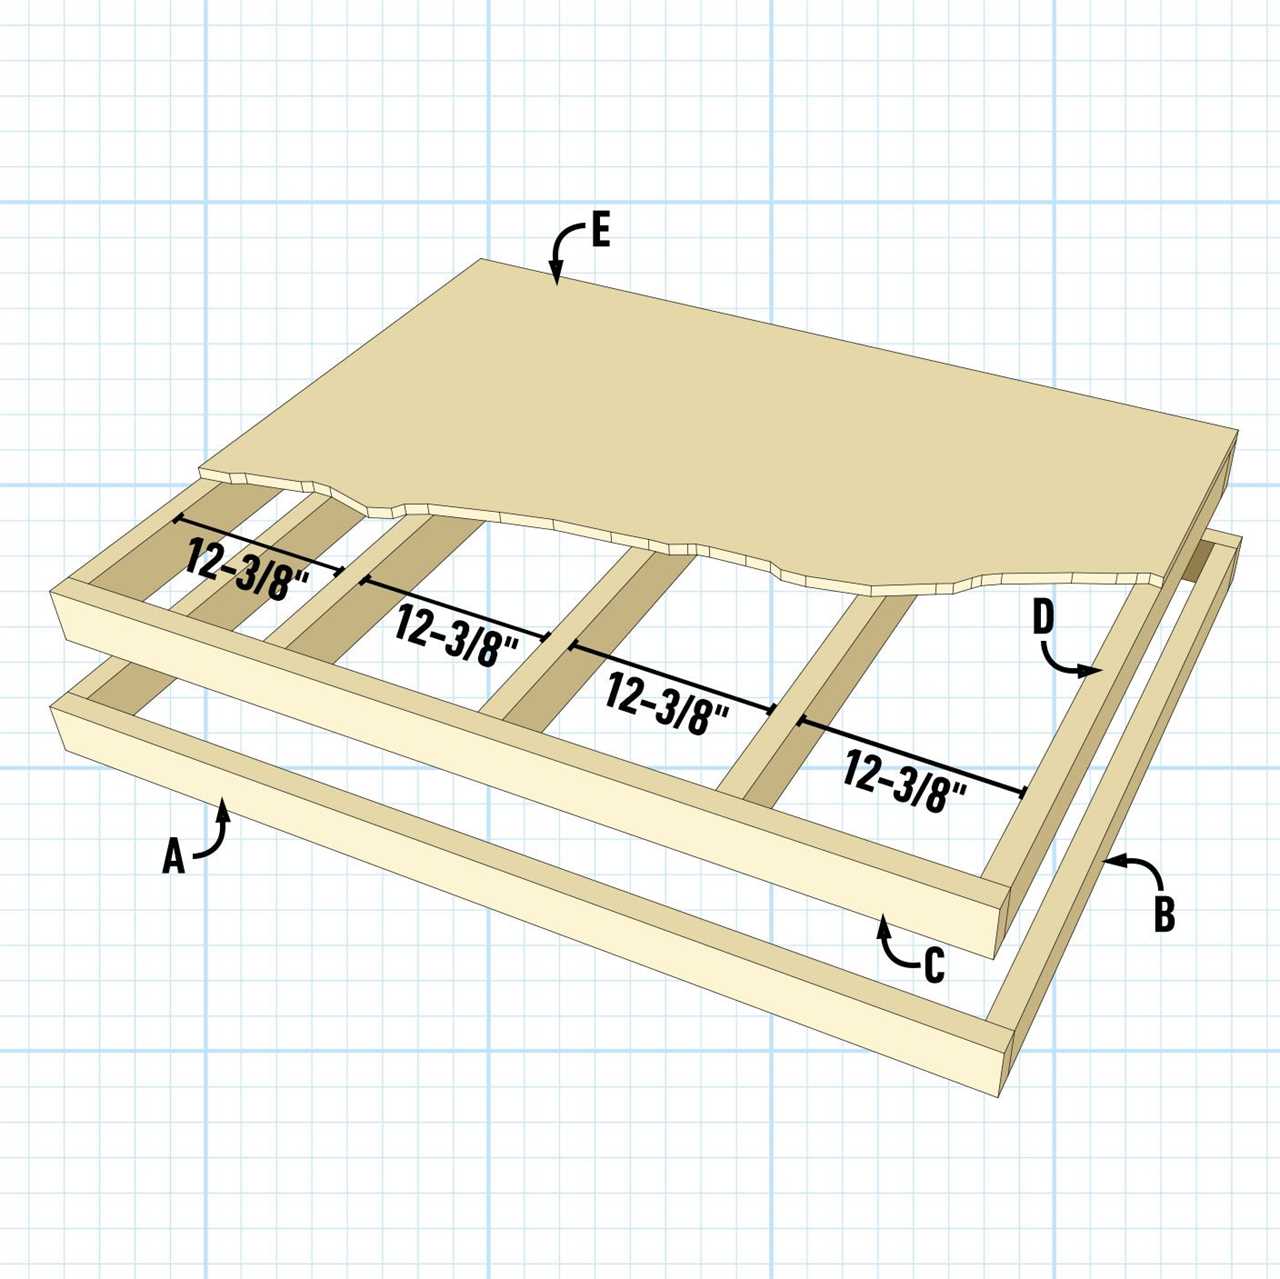
- Let’s start this project from the ground up and build the floor base first. Start by cutting and assembling four pressure-treated ground contact 2x4s for the floor outer base frame using #9 x 3-in. deck screws.
- Next, measure the inside of the outer frame to get the dimensions for the inner frame. Then cut and assemble the inner frame adding support boards evenly spaced as shown above.
- Insert and attach the inner frame to the inside of the outer frame, letting the inner frame stick up 1-1/2-inches from the top edge of the outer frame.
Install the Floor
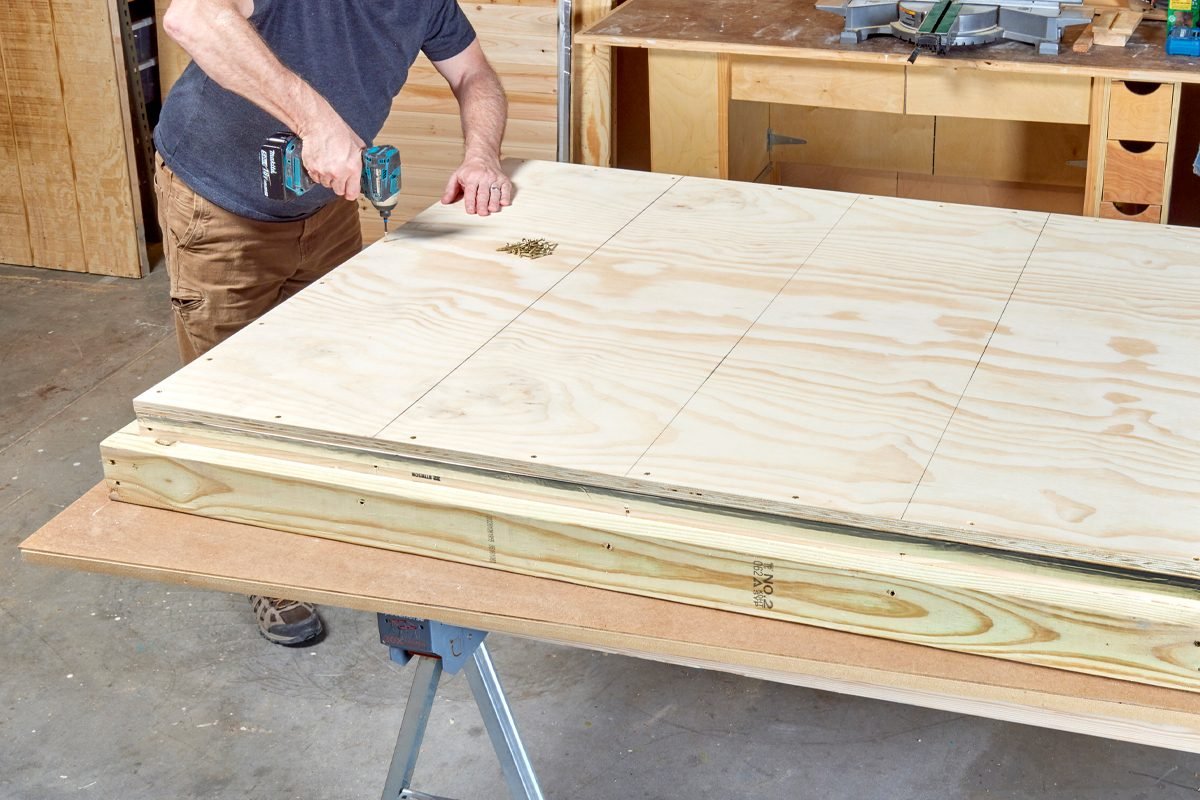
- Cut a piece of 3/4-in. plywood the size of the base inner frame.
- Before attaching the plywood floor to the base, insulate the spaces between each stud with 1-1/2-inch foam insulation.
- Attach the plywood to the floor base using #8 x 2-in. exterior screws.